Words by Wendy Bliss of Clip and Canter
In this edition’s Enhanced Riding article, we are going to take a detailed look at more in-hand work and the first stages of backing your horse. We are going to explain the best approach to the first ridden steps you take on your horse, after all, they may be the most important, as this will lay the foundations of your horse’s education.
There are of course many different approaches to backing and early schooling, and we will look at a few of these in future articles as we discuss the different options. The most significant considerations are, of course, the horse’s mental and physical welfare and your own safety. Giving your horse a pleasant experience, while feeling confident and relaxed in yourself, is of great importance in order to help prevent undesirable behaviour being set up. In sharing with you some secrets to success and how to avoid potential problems we will take you on an inspiring journey.
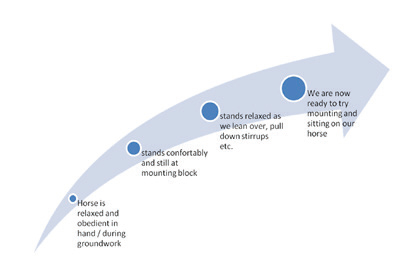
In our previous article we covered mounting block work, a very important foundation for beginning to back your horse. We must ensure that the horse stands still, calmly and relaxed, before attempting to lean over or mount.
The backing process
Once your horse is happy to stand calmly in the work area and you have performed appropriate groundwork we can begin to think about climbing aboard. If the process is at all rushed, we risk disaster. It is important to mount or lean over at the correct moment otherwise the horse may shoot forward, spook, or react in an undesirable way giving both the rider and the horse a bad experience.
By this stage, the horse should find standing by the mounting block a nice, calm experience, by way of the rewards offered in training. Avoid pulling the stirrups down abruptly, banging the saddle, or jumping up and down. This will make your horse want to run away! Instead, gently pull the stirrups down watching for a reaction. If there is a reaction, stop and settle the horse back down in a reassuring way. This applies to everything we do; we cannot move on to the next step before the previous one is sorted.
It is also a good idea to walk your horse in-hand or work him in one of the other methods practiced, such as lunging, before getting on. Your horse will then have seen everything within the work area and should be in work mode.
 |
Begin by gently touching the horse’s sides with the stirrups. There should not be a visible reaction but if there is, simply repeat things until the horse is calm. Next, climb very slowly onto the mounting block. At this point remember that it is quite threatening to a horse to have a human above his eye line; his instinct is to run so he cannot be eaten! Once established up on the block, remain there touching the saddle gently with your palms, patting, reassuring and even grooming the horse’s withers.
If there is a reaction, just correct it and start again. For example, if he walks forwards, simply resituate him back to the correct position, relax him, and start again. A pressure halter is particularly useful at this stage as it means you won’t be pulling the bit in his mouth. If all this goes according to plan, and remember, each horse is different, then we can start to think about applying pressure and weight in the saddle by leaning over.
For some horses this will be achieved in the first session, others will require several more sessions until the horse stands and relaxes with you above him, on the mounting block. Watch for reactions such as a high head, ears pinned back, tension and fidgeting. These reactions tell you it is not the best time to try and go any further. Wait until your horse’s head is low and relaxed, and he is standing comfortably.
Never try to lean over if you or your helper has to hold the horse tightly in place! He is not ready and force is not the answer; to do so can just instil fear in your horse.
Once you have leant over and the horse happily stands, you are ready to mount. If your horse has had plenty of mounting block work and leaning then this should go very smoothly. Climb on as gently as we can without any sudden movements or banging in the saddle. Sit up very slowly and reassure the horse with your voice and by stroking and grooming the withers. Your assistant could do the same as well. With a pressure halter over the bridle, held with a lunge line, and if the appropriate groundwork has been done, all is in place to calmly cope should the horse spook or panic. Your assistant can then help to calm the situation down. This very rarely happens though if you have followed the process fully.
At this point it may be advisable to dismount, carry out some more groundwork and then repeat the process. Be as deliberate and quiet for dismounting as you are when mounting. Spend the next few sessions just practicing getting on and off, but always very quietly and leaning over first. Once your horse is comfortable with the mounting and dismounting process we can begin to think about taking our first steps, accustoming the horses to the weight of carrying a rider.
Your assistant can step a little way in front and the horse will usually follow. Repeat this process a few times and then dismount. If the horse remains calm and relaxed we know we can do some more work. However, if the horse becomes tense, keep the sessions short until he starts to accept the weight and relaxes fully. Never expect your horse to know instinctively what your legs and hands and other aids mean. We need to teach him those cues over time and our range of groundwork exercises will help with that.
If you have done some straight-line work in-hand with a pressure halter, this will be particularly useful if you have an assistant. For example, once you are ready to begin teaching your horse to stop and start and walk in a straight line while ridden, your assistant can use her body language to assist in achieving the movement and direction as you practice the aids. A ground assistant will help teach the horse to understand what his rider is asking for.
Getting moving
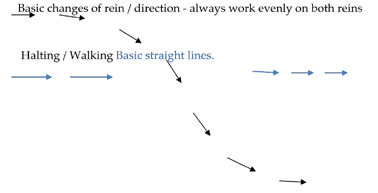
The diagram below illustrates some suggested in-hand work suitable for early schooling. The rider starts to place leg aids on and verbally asking the horse to walk on while the assistant starts to walk. If nothing happens, the assistant can apply gentle pressure to the pressure halter at the same time as the leg aid is given. Through repetition your horse should quickly realise what the leg aids mean.
When asking for halt, the assistant can stop, as the rider verbally cues while easing off with the leg aid and gently half-halting on the outside rein, keeping their seat still. The horse will soon realise how and when to stop. If the in-hand work has been repeated as set out in the diagram then it should be easy for the horse to understand what he is being asked to do. He will know from the assistant’s body language whether to stay out, stop, and/or start. After a few sessions the rider will become independent of the assistant and the horse will understand what the aids mean as they have been explained clearly, quietly and consistently.
 |
Always work your horse evenly on both reins even if he is stiffer or falls in and is slower. This is essential for your horse’s correct development. It is normal for a horse to find one rein, often the right rein, trickier, just as we are left or right handed. Working more on the tricky rein may cause injury or strain to the horse’s weaker muscles. It is important that we don’t try to trot or canter before straight lines and basic turns are established in walk.
In the next issue we look at further in-hand work that will help teach the horse the aids, and some more early schooling tips using cones and poles. We will also look at how to ask for the first trot under saddle. Don’t miss it!
Find out more about Wendy Bliss, her experience, and work at www.clipandcanter.webs.com


